A scrunchie looks like the simplest thing you could order, and that is exactly why so many custom runs come back wrong. The finished piece is a fabric tube gathered onto a loop of elastic, but the size, the amount of fabric, the elastic, the branding, and the packaging are all separate decisions, and getting one of them out of step is what produces a scrunchie that sits flat, feels cheap, or does not match the sample. Treating the order as a short spec sheet rather than a single line item is the difference between a batch you are proud to hand out and one you quietly reorder. Here is the sequence to work through.
Step 1: Decide the Finished Size First
Everything downstream flows from the finished size, so settle it before you talk fabric or price. The market clusters around a standard scrunchie of roughly a four-inch outer diameter, which is the everyday size most people picture, and an oversized or jumbo scrunchie around six inches, which reads as more fashion-forward and photographs bigger on a wrist or a shelf. Thinner hair ties sit below both, at well under an inch of visible fabric. Size is not just aesthetics: a bigger finished scrunchie needs meaningfully more fabric and longer elastic, which changes the unit cost, so pick the size that matches how the piece will be used and seen rather than defaulting to the largest option.
Step 2: Translate Size Into Cut Dimensions
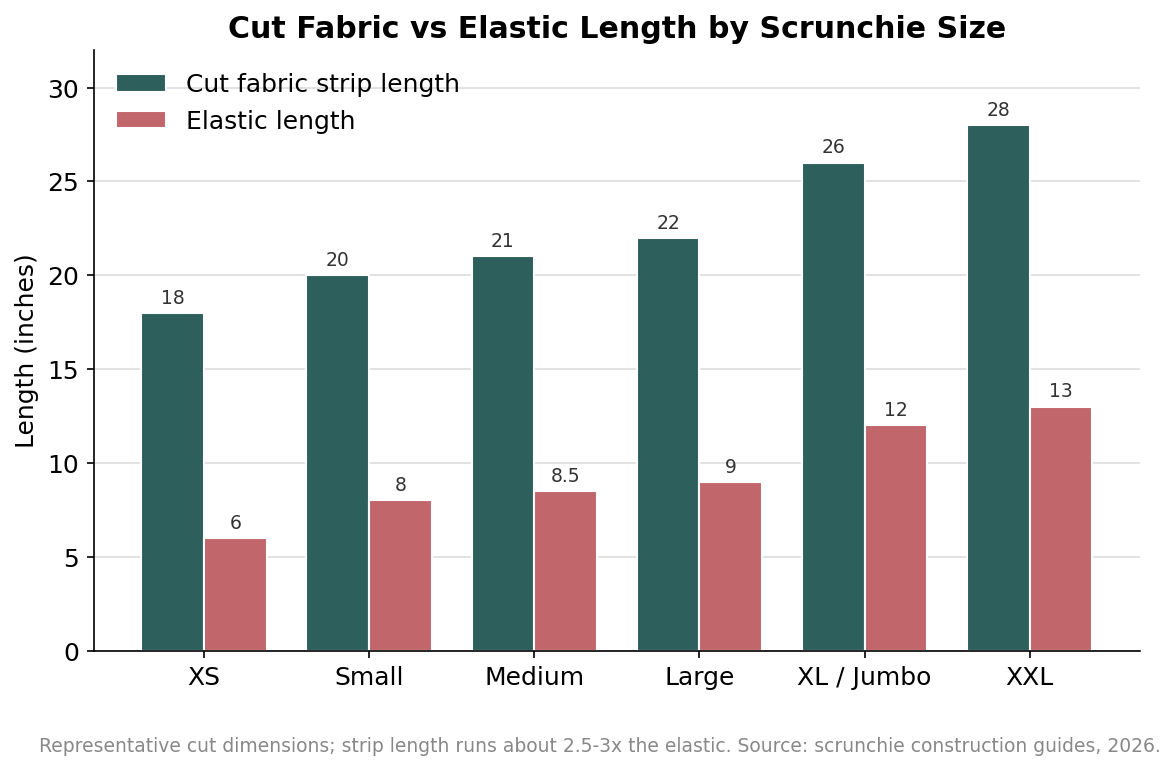
Once the finished size is fixed, it converts into two cut numbers the maker actually works from: the fabric strip and the elastic. A useful rule of thumb is that the cut fabric length runs about 2.5 to 3 times the length of the elastic, because that extra length is what creates the gather and the fullness. The fabric height is cut to roughly double the finished tube width plus about half an inch for seam allowance. In practice a small scrunchie is cut near two and a half inches wide by twenty inches long over an eight-inch elastic, a large one around three and a half by twenty-two inches over a nine-inch elastic, and a jumbo closer to five by twenty-six inches over a twelve-inch elastic. If a scrunchie looks disappointingly flat, the usual culprit is a fabric strip that was cut too short for its elastic, so this ratio is worth stating explicitly on your order rather than leaving to assumption.
Step 3: Choose the Fabric and the Elastic Quality
Fabric sets the look and feel, and the common custom options each behave differently. Satin gives a glossy, inexpensive sheen and is the volume favorite, though it is not the same as genuine silk, which costs more and has a softer, gentler hand that is kinder to hair. Cotton and jersey feel casual and hold print well, while velvet reads as plush and premium and eats more fabric to look right. Just as important, and easy to overlook, is the elastic: a thin, low-quality elastic loses its stretch quickly and lets the tube collapse, so specify a good high-elasticity core rather than accepting whatever is cheapest. The fabric earns the compliments, but the elastic decides whether the scrunchie still works after a month of daily use.
Step 4: Specify How the Branding Goes On
There are a few distinct ways to put a brand on a scrunchie, and they are not interchangeable. All-over dye sublimation printing bonds full-color artwork and patterns into synthetic fabric, which is the route for photographic or edge-to-edge designs. Screen printing handles simple spot-color logos, and is more common on the flat surface of thin hair ties than on gathered scrunchies. A woven or printed label stitched into the seam adds a discreet, retail-looking brand mark, and a hang tag carries branding at the point of sale without touching the fabric at all. Decide whether the brand should live on the fabric, on a label, or on the packaging, because that choice interacts with both the fabric you picked and the way the finished pieces are packed.
Step 5: Set Quantity, Packaging, and Lead Time
Quantity changes what each scrunchie costs, because setup work is shared across the whole run and volume tiers bring the cost per piece down as the order grows. At Customized Scrunchies the minimum order is 100 scrunchies, so a small shop or a single team can order without committing to thousands. Oversized pieces use more fabric and elastic, so they are quoted separately from standard sizes. Packaging is the final decision: a loose poly bag is simplest, a hang tag lifts perceived value, and carded retail sets, often sold as three-packs, turn a commodity accessory into a shelf-ready product. On timing, your free mockup arrives within 24 hours and finished scrunchies ship in about 2 weeks, so anchor the order to your deadline before you commit.
None of these steps is complicated on its own, but skipping any one of them is where custom scrunchie orders go sideways. Write the finished size, the cut fabric and elastic dimensions, the fabric and elastic grade, the branding method, and the packaging into a single short brief, then order a physical sample against that brief before you run the full quantity. The dimensions above are indicative rules of thumb rather than fixed specifications, so use them to frame the conversation and confirm the specifics on your free mockup and quote for your exact fabric and volume.